Ho, ho, ho my readers!
Thank you for visiting and Merry Christmas to you! I don't know if I'll have time to write again before Christmas. I thought I'd take the time today to extend wishes of love to each of you during this beautiful season of the year! Each of you is a treasure!
Our challenge this fortnight at HOOKED ON CRAFT is to celebrate the spirit of the season - Christmas - by creating a special something that is reminiscent of Christmas. This challenge runs from December 12 to the 24. What you create is entirely up to you! You always design such lovely things, so this shouldn't be hard at all. ! I considered making a card but thought that maybe this little project might be useful to others who view it. There are a lot of photos, so be prepared!
Inside the bags are eight BROWN candies and one RED candy. I apologize that they look black. For this project, I used the wonderful series of six Christmas Reindeer stamps available at HOOKED ON CRAFT. I also used little red pearls for Rudolph's nose, gorgeous Poinsettia flowers in assorted colors, Kindyglitz for the glitter, Copic markers, some Snow Tex, and a little tiny bit of cotton for the tails! Are you ready? On Dasher, on Dancer, on Prancer, on Vixen on Comet, on Cupid, on Donner and Blitzen!
This is the group shot of all the treat bags.
Aren't they delightful! I wish I could say I originated the concept, but sadly, someone else thought that up. I just created the topper the way I wanted it to be for me. I love how my topper turned out. I used my Nesties, Marianne Design, and Cheery Lynn dies to cut the elements out.
Here are the closer shots of each individual bag:
If you're still with me at this point, here are the closeups of the tags:
Well, that's all she wrote, folks! I hope you liked my little collection of sweeties! Good luck on the challenge! Remember, you have until Dec. 24!
Blessings to you,
Chris
I would like to enter this project into the following challenges:
1. The Crafty Blogger's Network #7 - ends 12/18 - Christmas Gift
2. Crafty Boots Challenges ends 12/25 - Christmas
3. Forever Friends - ends 12/22 - Roses (in my case, noses) are Red :o)
4. iCopic Weekly Challenge #60 ends 12/18 - Holidays
5. Truly Madly Crafty Challenges #5 ends 12/31 - Christmas Images and Colors
6. Paper Sundays #99 ends 12/17 - Anything Christmas
7. Lawnscaping Challenges #23 ends 12/14 - Tags or Treat Bags
8. Just Some Lines - ends 12/16 - Handmade gift
Monday, December 12, 2011
Sunday, November 27, 2011
Hooked on Craft Challenge #13 - Winter Wonderland
Hello My Fair Ladies,
First of all, I want to express huge CONGRATULATIONS to Karen (the owner of Hooked on Craft) and her husband on the birth of their twins. They were blessed with one of each! Everyone is doing well. Good work, Karen!
Well, November has almost crept right by! Thanksgiving is over, the Christmas tree is up, the outside Christmas lights are twinkling tonight, and I am so ready for a long winter's nap now that Thanksgiving is over!
How was your Thanksgiving? Ours was wonderful! The turkey was perfectly done and not all dry and nasty. My yam casserole was delish. This year, I added chopped dates to it and wow! Did it add a nice subtle flavor. It's weird, though as the dates must have dissolved as we couldn't find any pieces in the casserole at all. My homemade cranberry sauce was nice and refreshing. I always like to add dried fruit to it (even if they are rock hard). This year, I had some hard-as-rock blueberries which I added to the mix. By the time they were cooked and left to set for a couple of days, they were all plump again. The stuffing was a hit with DH as he loves my stuffing. It was a unanimous A+ dinner!
It's time again for a new challenge at Hooked on Craft Challenges. This time, the challenge is to create a card using a Winter Wonderland theme. Here are the details:
This challenge will run from November 28 to Dec. 10. This challenge may include snowmen, Christmas, penguins, cold things, blue, snowflakes, ice, snow - anything involving those cold Winter topics! You may incorporate it into your project in any way you wish. How fun is that? You're in the cat bird seat on this one, ladies! Go for it!
This challenge was right up my alley as Winter is my favorite season! I chose aqua, red, and white as my color scheme. I think it tuned out so well, too! What sayest thou?
Here is the front of my card:
For this panel, I used the delightful Snowman with Heart Buttons stamp from Hooked on Craft. I also used a Memory Box corner die, Magnolia Sweden Doo-hickey tag die set for the tag that is in the pocket. I colored the white mums a matching blue. Gotta love that you can recolor your flowers when you need to match them up! You can find the following products used on this panel at Hooked on Craft:
doily - http://www.hookedoncraft.com/embellishments/paper-lace-doylies/126mm-white-paper-lace-doylies-in-a-pack-25.html
red pearls - http://www.hookedoncraft.com/embellishments/self-adhesive-pearls/self-adhesive-red-pearls-pack-100.html
bird trinkey pin - http://www.hookedoncraft.com/embellishments/decorative-trinket-pins/garden-mix-trinket-pins/handmade-decorative-trinket-garden-mix-pins.html
snowflake charm - http://www.hookedoncraft.com/embellishments/metal-charms/10-pack-of-christmas-mix-of-metal-charms.html
snowman stamp - http://www.hookedoncraft.com/stamps/christmas/santa-snowmen/snowman-with-heart-buttons.html
large white rose - http://www.hookedoncraft.com/flowers-and-leaves/mulberry-paper-curly-roses/mulberry-paper-32mm-curly-roses/32mm-white-curly-mulberry-paper-roses-5-pack.html
red rosebuds - http://www.hookedoncraft.com/flowers-and-leaves/mulberry-paper-rosebuds/small-red-mulberry-paper-closed-rosebuds-20-pack.html
white holly leaves - http://www.hookedoncraft.com/flowers-and-leaves/mulberry-paper-leaves/white-holly-mulberry-paper-leaves-20-pack.html
white mum flowers - http://www.hookedoncraft.com/flowers-and-leaves/mulberry-paper-chrysanthemum-aster-flowers/15mm-white-mulberry-paper-chrysanthemum-aster-flowers-20-pack.html
This is the inside left of the card. i chose a paper line by Martha Stewart for this card. i liked this paper as the work was already done for me! LOL. The white areas are all nicely glittered during the paper production. I chose to repeat the same Memory Box corner die as I used on the front along with the red pearls and white mums. I also added teeny tiny gems to certain areas of the die cut to enhance the sparkle of my card. The red flower is from my stash.
You can find the following products at Hooked on Craft:
red pearls - http://www.hookedoncraft.com/embellishments/self-adhesive-pearls/self-adhesive-red-pearls-pack-100.html
white mum flowers - http://www.hookedoncraft.com/flowers-and-leaves/mulberry-paper-chrysanthemum-aster-flowers/15mm-white-mulberry-paper-chrysanthemum-aster-flowers-20-pack.html
Let's take a peek at the right side of my card. I like to leave this side blank so that the sender can write their own special message. For this side, I chose to use a Marianne Design Die for the center element. To the die cut, I added a blue piece that matches the background paper. I debated adding a white snowflake to the center of the bow but DH said he liked it better without. Think I should add a sweet white snowflake to the centerpoint of the bow? I finished it off with another corner die, teeny tiny gems, pearls, and flowers. Don't you just love that red and white snowflake ribbon?
The following items may be purchased at Hooked on Craft:
red pearls - http://www.hookedoncraft.com/embellishments/self-adhesive-pearls/self-adhesive-red-pearls-pack-100.html
white mum flowers - http://www.hookedoncraft.com/flowers-and-leaves/mulberry-paper-chrysanthemum-aster-flowers/15mm-white-mulberry-paper-chrysanthemum-aster-flowers-20-pack.html
Last, but not least, is a shot of the inside pages together.
Thank you so very, very much for stopping by! I hope I've provided a bit of inspiration for you so that you will participate in Challenge #13, Winter Wonderland. I can't wait to see your amazing creations!
XO,
Chris
I would like to enter this card into the following challeges:
Sunday, November 13, 2011
Hooked on Craft Challenge #12 - Something Punched
Dearest Readers,
Thank you so much for visiting my blog today! Happy 11-11-11! What a fun date to be born on! It's also one of those great dates to be married on so your significant other won't forget your anniversary too easily! Was it a lucky day for you? It was a wonderful day for me! When you read this post, though, it won't be 11-11-11 as I'm writing early to post at a later date.
I have such a fun card to share with you. The challenge at Hooked on Craft for this fortnight is "Something Punched." You may include anything punched or diecut on your project. The project will run from November 14 until November 26. There are so many options for you to use as well as themes. The Design Team has created such wonderful projects for inspiration. What an array of colors and themes! I hope you will join in the challenge! As always, Karen has provided a wonderful prize for one lucky participant!
I'd like to share my inspirational card with you. I hope you like it. I had seen something similar on a blog a few years ago. Here is the link: http://istamp4u.blogspot.com/2008/10/halloween-card.html. I never forgot how that gal had made a pumpkin shaped card using her Nesties. I knew I had to make one, too! Because I am in the Northern Hemisphere, we're having Fall right now. I wanted to keep to the Fall theme because of the yummo leaves and flowers that Karen carries at Hooked on Craft. Here is my card:
Isn't that little duckling adorable? I thought his happy little image just matched the sentiment perfectly. You can find the duckling HERE.
I created the pumpkin shape by repeating a Nestabilities die cut three times, embossing each piece, positioning them so that they looked like a pumpkin shape, gluing them together, and cutting the base so they were even. I inked the edges to add some additional depth. Next, I drew the stem and vines, embossed the paper strips, cut them, inked them, and attached them into place. I then traced the shape onto a folded piece of cardstock to form the card base and attached the decorated pumpkin topper to the front of the folded card. Does this make sense? I didn't want the embossed pumpkin to be the front flap of the card. I wanted it to be the cover attached to the front flap.
Now comes the fun part! The embellishing of the pumpkin! I used the most amazing mulberry oak leaves from Hooked on Craft. I loved the Autumnal colors! You can find the Fall Mulberry Oak Leaves HERE. I also used two yellow Daffodils and an orange Tiger Lily. The little sunflower is from my stash.
Now to the inside! Here it is:
Because the challenge was to use something punched, I went die cut crazy! LOL The left side has an assortment of layered die cuts. The center flower is from my stash while the orange Tiger Lilies are from Hooked on Craft.
On the right side, I repeated the flower pattern and added an embossed die cut panel for a personal note. I used machine stitching around both decorative mats prior to embellishing.
I hope you like my little pumpkin. I had a great time making it! I couldn't have done it without the wonderful supplies from Hooked on Craft!
Have a wonderful week! I hope you will join in the challenge. I can't wait to see what you submit! Good luck gals!
XO,
Chris
I would like to enter this card into the following challenges:
Monday, October 31, 2011
Tilda Gives Flu Shots!
Hi Girls,
Have you gotten your flu shot yet? DH and I got ours last week. The doctor's PA is an adorable, kind, happy, efficient 20 something that is such a plus! I would love to have just a tiny bit of her serotonin! You would just fall in love with her when you met her. While we were in the office, we were chatting about balsamic vinegar. I told her that I have some that is very aged, thick, sweetish in flavor, and so unlike the balsamic on the market shelves. Because I appreciate all she does for us, I decided to give her one of my bottles. I wanted her to know we were thinking of her as well as being grateful for all she does for us. Well, to go along with the balsamic vinegar, I thought I'd make a card for her. She's very girly (with long, dark hair), so I decided to make the card pink and girly.
I chose the Nurse Tilda stamp which is available at Magnolia-licious. As a matter of fact, Diana has Doctor Edwin (the stamp that is exclusive to Magnolia-licious) and the minis of both Edwin and Tilda. You should pay Diana's Magnolia-licious Shop a visit. She has an amazing collection of Magnolia Sweden products!
Ok, back to the card. I cut the shape using my Nestabilities Grand Circle and Scalloped Circle dies. I lined the inside of the top and added gorgeous papers from Papermania. I wanted some texture, so I did some machine stitching. A touch of lace and some pretty flowers finished off the top. I don't like machine stitching to show on the backs of my cards, so I made a third scalloped circle and covered the stitching on the backside. Tucked inside is a nice, large tag on which I'll write a message. I added a "Made with Love" charm to the bow by sewing it to the bow. Tilda was colored using Distress Ink.
I hope you liked this sweet card. I'm not a pink lover, but I do love how this card turned out.
Thanks for stopping by!
XO,
Chris
I would like to enter this card into the following challenges:
1. Magnolia-licious Highlights October challenge ends 10/31 - Using Doctor or Nurse Edwin
2. Cutie Pie Challenge Blog #4 (ends 11/13) - Use a Charm
3. Die Cut Dreams #101 (ends 11/5 ) - So Charming
4. Stamptacular Sunday Challenge#136 (ends 11/5) - Borders and Frames
5. Mark's Finest Papers #79 (ends 11/4) - Use Your Scraps
6. One Stop Craft Challenges #155 (ends 11/4) - No Sentiments
7. Challenge Up Your Life #55 (ends 11/4) - Color Challenge
Sunday, October 30, 2011
It's a Blue Halloween!
Trick or treat - smell my feet - give me something good to eat! LOL It's that time of the year! Are you ready for the barrage of munchkins who will soon be knocking at your door?
OK, I have to tell you what I saw on TV! A particular show has been sharing recipes all week which use your children's candy. I thought it would be interesting to see what to do with those Tootsie Rolls, LOL. The recipe that made my heart pause and almost call the local coronary care unit all by itself was one using Milky Way Bars. Girls, the cake called for 11 regular sized Milky Way Bars and two sticks of butter! Seriously! If that wasn't a recipe for a clogged artery, I don't know what was! Oh my gosh, I couldn't believe it. If anyone wants the recipe, let me know and I'll copy and send it to you - privately! LOL
I decided to do an unusual Halloween colored card. We all use orange and black, or green, purple, orange, and black. I decided to use blue and black for my card. The papers I chose are Authentique Journey. I think it turned out kinda cool. It looks cold and spooky, LOL, to me, at least. Here is the cover:
For this part of my card, I created a scene using four Magnolia stamps. The tree limb is called Spooky Moon from the 2009 So Spooky collection I masked the moon and kept the tree branch. I also used the owl, pumpkin and leaves, and the toadstools from the Sweet Rainbow Collection. The Pumpkin and Leaves can be found at Scrapalicious.I wanted the perfect backdrop for my little Witchy Bear! Isn't she just the cutest? You can find her at Hooked on Craft. Her name is Bear with Cauldron. I chose to add some dimensional stars and bubbles to the airspace above her cauldron. I also added some acrylic blue stars. The aqua star flower was perfect to pair up with some black flowers and seeds I had in my stash. The images were colored with Distress Inks. I added a touch of sparkle to the eyes of the owl andsome of the spots found on the mushrooms. I replaced the "O" in Halloween with a aqua rhinestone.
Well, there you have it - my first blue Halloween card! What do you think? I'd love to know! I put myself out there, so we'll see if the reactions are favorable or not.
I hope you have a wonderful Halloween. May you get all the chocolate you can muster! Thanks so much for visiting. I'm so glad you took the time to stop by.
Love to you,
Chris
I would like to enter my card into the following challenges:
1. Crafty Calendar Challengeends 11/4 - Spooky
2. Stampin' for the Weekend #19 ends 11/3 - Spooky
3. Crafty Ribbons Challenge #5 ends 11/9 - Bingo (middle row horizontally)
4. Paper Play Challenges#43 ends 11/2 - Halloween Inspiration
5. Crafts and Me Challenges#58 ends 11/1 - Blue
6. Scrapaliciousends 11/1 - Halloween Spook
7. Simon Saysends 11/1 - Anything Goes
8. The Paper Variety Wk. 57 ends 11/1 - Cute or Spooky Halloween
Tuesday, October 25, 2011
Tilda Boxes Against Breast Cancer
Hi Sweetpeas!
I hope this message finds you well. This is all doctor appointment week for us. Make sure you get your flu shots! We got ours yesterday. The temperatures are supposed to plummet tomorrow by at least 25 degrees! woo Hoo! Come on Fall! They are even predicting snow in some higher elevations.
I made this card a couple of weeks ago, but forgot to take the photos and post it. I hope you like it. I used our little Tilda wearing boxing gloves stamp. I did hte last one in red and charcoal. I decided to girly this one up a bit. Here she is:
I used paper from my stash and some lovely flowers from Hooked on Craft. I made the wrought iron gate using my Cricut. I liked having a bit of texture behind the image. The scalloped mat was done using my Nesties with glittered cardstock. I added two little pink ribbons to Tilda's pig tails. I love it when I can add teeny tiny bows!
This is the inside of the card. I'll just insert all of the photos at once.
I love the softness of this card. The tag is removable as you can see. I also left an area for personal sentiments. The oval was bordered witht he pink glittered cardstock as found on the cover of the card.
Thank you so much for visiting. I hope you liked my work. I'd love a comment if you have time time!
XO,
Chris
I would like to enter this card into the following challenges:
Just Magnolia - Breast Cancer Awareness
Paper Cutz Challenges #114 - ends 10/27 - Breast Cancer Awareness
Crafty Ribbon Challenge#5 - ends 11/9 - Bingo
Simon Says Stamp ends 11/1- Anything Goes
Paper Playtime #58 - ends 10/29 - Say it w/Sentiments and use Buttons and Bows
The Outlawz - Pink Awareness
Magnolia Down Under Challenges #119 - ends 10/29 - Getting Punchy
Sunday, October 16, 2011
Something Spooky - Hooked on Craft Challenge #10
Happy, happy Monday, my Lovlies!
Oh, my favorite time of year is getting closer and closer! The holidays! Halloween, Thanksgiving, Christmas, and New Year's Day - all coming up faster and faster! I hope all of you are well. Everyone is fine. Precious, the Maine Coon, has been helping me make cards! LOL Cedar, the cat that is vision impaired, has developed a need to come into my scrap room at night and find something she wants. We find girly things around the house that came from my scrap room! It might be flowers or a piece of ribbon. It's been wonderful learning that even the female gender in the cat world is feminine, too! They are our little fur babies. We love them dearly.
DH is always carrying Cedar around the house. She is very thin with the thinnest, longest legs and tail! She only weighs about six pounds. One of her new things to do is leap into the air like a kangaroo! Yesterday, from a sitting position, she reached over three feet in height and over four feet in length. She forms her body like the letter "C" or like a half moon. Her body remains vertical during flight! LOL - It's hilarious. I would love to get a photo of her doing it, but I never know when she's going to go airborne! Precious weighs about 14 lbs. She's very big with shorter, thick legs. She's quite a bundle. When I hold her, she just fills my arms completely. LOL
OK, now for the goodies! Our new challenge at Hooked on Craft Challenges for the next two weeks is....**drumroll, please**...
Something Spooky
This challenge will run from October 17 to October 29. There is so much you can do with a theme like this! Also, there is amazing inspiration from the Design Team! You could make a project, card, layout - go in whatever direction your mind decides. Just make sure that it is something spooky.
Here is my example for this challenge:
Isn't that Mummy Bear stamp just the cutest? I wanted his bandages to look old and dirty, so I tinted the brown. I also popped him up using pop dots. I love when I can create various elevations. The background is a modified Magnolia stamp. I created a circular spiderweb trimmed circle mat using one of my punches. The image has been colored using Distress Inks. I love lots of mats as you can see! I used an assortment of papers from my stash. I thought the bakers twine would also be fun. Karen has the gorgeous flowers and stick pin. I thought the pin could also be used as a spidery looking embellie. I know it's a butterfly, but when I look at it, I also see a spider! LOL The little orange flowers under the purple rose were white. I chose to color them orange with a Copic marker.
Here's a look at the inside:
I am so in love with this collection of bear stamps! This time, I chose to use the Bat Bear stamp. He's so cute! I cut the two images separately and applied the bat to the upper left. Both critters are on pop dots to elevate them.
I used an assortment of papers from my supplies as well as the spiderweb border and corner punches. I, then, went to my flowers to make the clusters. I'm trying to remember to make the interior clusters flatter so that the cards close more flatly. Here are links to all the flowers I used on this card:
Flower Links:
Front of Card:
A. Large Purple Rose - http://www.hookedoncraft.com/flowers-and-leaves/mulberry-paper-roses/mulberry-paper-35mm-roses/35mm-premium-open-roses-purple-mix-mulberry-paper-roses-10-pack.html
B. Light Green Roses - http://www.hookedoncraft.com/flowers-and-leaves/mulberry-paper-roses/mulberry-paper-14mm-roses/14mm-light-green-mulberry-paper-roses-20-pack.html
C. Yellow Tiger Lilies - http://www.hookedoncraft.com/flowers-and-leaves/mulberry-paper-tiger-lily/yellow-mulberry-paper-tiger-lily-flowers-10-pack.html
D. Chrysanthemums - I colored mine orange using a Copic marker - http://www.hookedoncraft.com/flowers-and-leaves/mulberry-paper-chrysanthemum-aster-flowers/15mm-white-mulberry-paper-chrysanthemum-aster-flowers-20-pack.html
Interior of Card:
E. Water Lilies - I colored mine black using my Copic marker - http://www.hookedoncraft.com/flowers-and-leaves/mulberry-paper-water-lily/25mm-white-mulberry-paper-water-lily-flowers-10-pack.html
F. Purple Tiger Lily - http://www.hookedoncraft.com/flowers-and-leaves/mulberry-paper-tiger-lily/purple-mulberry-paper-tiger-lily-flowers-10-pack.html
G. Purple Orchid - http://www.hookedoncraft.com/flowers-and-leaves/mulberry-paper-orchids/purple-mulberry-paper-orchid-flowers-10-pack.html
That pretty much is it, folks! Thank you so much for stopping by! I so love your treasured visits. Please leave a comment if you like. They are so much fun to read and mean the world to me (as long as they are good ones, LOL).
XO,
Chris
I would like to enter this card into the following challenges:
1. Stamping Scrapping Challenge Central ends 10/31- Halloween
2. Sparkles Forum Challenges #22 - Halloween
3. Creatalicious Challenges #27 (ends 11/14) - Distress Your Edges
4. Through the Craftroom Door Challenges #12 (ends 10/31) - Halloween w/ orange
5. Craft Your Days Away #31 (ends 10/26) - Halloween
6. Crafty Calendar Challenges # (ends 11/4) - Spooky Birthday
7. 7 Kids Challenge Blog #32 (ends 10/25) - Happy Halloween
Oh, my favorite time of year is getting closer and closer! The holidays! Halloween, Thanksgiving, Christmas, and New Year's Day - all coming up faster and faster! I hope all of you are well. Everyone is fine. Precious, the Maine Coon, has been helping me make cards! LOL Cedar, the cat that is vision impaired, has developed a need to come into my scrap room at night and find something she wants. We find girly things around the house that came from my scrap room! It might be flowers or a piece of ribbon. It's been wonderful learning that even the female gender in the cat world is feminine, too! They are our little fur babies. We love them dearly.
DH is always carrying Cedar around the house. She is very thin with the thinnest, longest legs and tail! She only weighs about six pounds. One of her new things to do is leap into the air like a kangaroo! Yesterday, from a sitting position, she reached over three feet in height and over four feet in length. She forms her body like the letter "C" or like a half moon. Her body remains vertical during flight! LOL - It's hilarious. I would love to get a photo of her doing it, but I never know when she's going to go airborne! Precious weighs about 14 lbs. She's very big with shorter, thick legs. She's quite a bundle. When I hold her, she just fills my arms completely. LOL
OK, now for the goodies! Our new challenge at Hooked on Craft Challenges for the next two weeks is....**drumroll, please**...
This challenge will run from October 17 to October 29. There is so much you can do with a theme like this! Also, there is amazing inspiration from the Design Team! You could make a project, card, layout - go in whatever direction your mind decides. Just make sure that it is something spooky.
Here is my example for this challenge:
Isn't that Mummy Bear stamp just the cutest? I wanted his bandages to look old and dirty, so I tinted the brown. I also popped him up using pop dots. I love when I can create various elevations. The background is a modified Magnolia stamp. I created a circular spiderweb trimmed circle mat using one of my punches. The image has been colored using Distress Inks. I love lots of mats as you can see! I used an assortment of papers from my stash. I thought the bakers twine would also be fun. Karen has the gorgeous flowers and stick pin. I thought the pin could also be used as a spidery looking embellie. I know it's a butterfly, but when I look at it, I also see a spider! LOL The little orange flowers under the purple rose were white. I chose to color them orange with a Copic marker.
Here's a look at the inside:
I am so in love with this collection of bear stamps! This time, I chose to use the Bat Bear stamp. He's so cute! I cut the two images separately and applied the bat to the upper left. Both critters are on pop dots to elevate them.
I used an assortment of papers from my supplies as well as the spiderweb border and corner punches. I, then, went to my flowers to make the clusters. I'm trying to remember to make the interior clusters flatter so that the cards close more flatly. Here are links to all the flowers I used on this card:
Flower Links:
Front of Card:
A. Large Purple Rose - http://www.hookedoncraft.com/flowers-and-leaves/mulberry-paper-roses/mulberry-paper-35mm-roses/35mm-premium-open-roses-purple-mix-mulberry-paper-roses-10-pack.html
B. Light Green Roses - http://www.hookedoncraft.com/flowers-and-leaves/mulberry-paper-roses/mulberry-paper-14mm-roses/14mm-light-green-mulberry-paper-roses-20-pack.html
C. Yellow Tiger Lilies - http://www.hookedoncraft.com/flowers-and-leaves/mulberry-paper-tiger-lily/yellow-mulberry-paper-tiger-lily-flowers-10-pack.html
D. Chrysanthemums - I colored mine orange using a Copic marker - http://www.hookedoncraft.com/flowers-and-leaves/mulberry-paper-chrysanthemum-aster-flowers/15mm-white-mulberry-paper-chrysanthemum-aster-flowers-20-pack.html
Interior of Card:
E. Water Lilies - I colored mine black using my Copic marker - http://www.hookedoncraft.com/flowers-and-leaves/mulberry-paper-water-lily/25mm-white-mulberry-paper-water-lily-flowers-10-pack.html
F. Purple Tiger Lily - http://www.hookedoncraft.com/flowers-and-leaves/mulberry-paper-tiger-lily/purple-mulberry-paper-tiger-lily-flowers-10-pack.html
G. Purple Orchid - http://www.hookedoncraft.com/flowers-and-leaves/mulberry-paper-orchids/purple-mulberry-paper-orchid-flowers-10-pack.html
That pretty much is it, folks! Thank you so much for stopping by! I so love your treasured visits. Please leave a comment if you like. They are so much fun to read and mean the world to me (as long as they are good ones, LOL).
XO,
Chris
I would like to enter this card into the following challenges:
1. Stamping Scrapping Challenge Central ends 10/31- Halloween
2. Sparkles Forum Challenges #22 - Halloween
3. Creatalicious Challenges #27 (ends 11/14) - Distress Your Edges
4. Through the Craftroom Door Challenges #12 (ends 10/31) - Halloween w/ orange
5. Craft Your Days Away #31 (ends 10/26) - Halloween
6. Crafty Calendar Challenges # (ends 11/4) - Spooky Birthday
7. 7 Kids Challenge Blog #32 (ends 10/25) - Happy Halloween
Sunday, October 2, 2011
Anything But a Card - Hooked on Craft Challenge #9
Happy October, everyone!
Oh, this is one of my favorite months! The leaves are changing. The temps are dropping. The spice scents coming from the kitchen are fantastic! My friend, Alice, brought over a yummy apple spice cake. So, it's not just me who is ready for this time of the year!
We have a wonderful new challenge at Hooked on Craft Challenges for you to join in on. The current challenge will get you thinking outside the box - or maybe about the box! It's ... *drumroll please* ...Anything but a Card! How perfect is that? Look at all the options! The design team has wonderful springboards for you to see. Their links are on the right side of my blog. Check them out! There are a wonderful variety of options done by these amazing gals! This challenge will run from Oct. 3 to Oct. 15. You've got plenty of time to get those creative juices flowing!
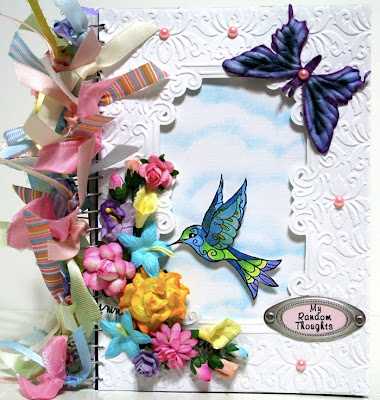
For my project, I altered a notebook cover to create my own multi-purpose notebook. I figured I could just write whatever I wanted before I forgot it, LOL! Goodness me, the older I get, the harder it is to remember! Here is an example - I walked into a room and said to my husband, "You know what?" He replied, "No, what?" I looked at him stupidly because whatever I wanted to tell him flew out of my head just as quickly as it had popped into my head! Honestly, I stood there shocked at myself! Just that fast, the idea flew out of my head! *blush* So, this little book should help! (hopefully)
Isn't it pretty, girly, too, huh? I began by using an embossing folder to create the white embossed background and window. I, then, chalked white CS to create the cloudy sky background to place behind the window opening. This created the perfect frame for the hummingbird. I added a gorgeous purple butterfly and some pink pearls. You can find them here:
Pink Pearls
Purple butterfly
I wanted to create something that reflected me. I so love my hummingbirds. I chose to use a delightful hummingbird stamp that will soon be found in Karen's online store. I colored the image with Twinkling H2Os. It gave the stamp such a subtle metallic sheen. Then, to do a little more, I created another layer by creating another wing on vellum paper. This has been attached at the "shoulder joint" to the base image and then elevated using a pop dot to give dimension reminiscent of flight. It looks like a third wing in the photo below, but that is just the way I angled the camera so you could see it more clearly. It looks wonderful IRL because the translucence of the colors on the vellum.
I chose flowers that were also bright and cheery. I love the selection of flowers found at Hooked on Craft. Karen has a wonderful variety in color and style. Here is what I used in my cluster:
Yellow Mulberry Curly Rose
Aqua Star Flowers
Chrysanthemum Flower
Pink Water Lily
Purple Orchid
Small Roses (purple and pink)
Yellow Calla Lilies
Rosebuds
I hope you liked what I've shared with you today. I love the femininity of it.
If you haven't yet visited Hooked on Craft, please check it out. The flowers are gorgeous. Karen's trinket pins are delightful! The stamps are adorable!
See you soon,
Chris
I would like to enter this journal into the following challenges:
1. Creatalicious Challenges #26 ends 10/14 - anything goes
2. Stamp, Scrap, and Doodle Saturdays ends 10/7- anything but a card
3. Crafts for Eternity#39 ends 10/6 - anything goes
4. Fussy and Fancy Challenges ends 10/6 - try a new technique (using Twinkling H2Os for me)
5. GlitterGeeks Blog Challenge Wk. 17 ends 10/6 - shabby chic
6. 4 Crafty Chicks #57 ends 10/5- anything goes
7. Paper-Crafting Journey #20 ends 10/11 - die cuts
8. Crafts and Me Challenges #54 ends 10/4 - flowers
9. Scrapalicious ends 10/4 - anything goes
10. Simon Says Stamp - anything goes
11. Whimsical Wednesdays ends 10/12 - anything goes
Friday, September 30, 2011
Tilda Loves You!
Dear September,
Good bye, farewell, auf wiedersehen, adieu - la, la, la, la, la, la, la, la, la, la, la, la, la, la! Did you think of the melody found in the song, So Long, Farewell, from The Sound of Music? Oh, October is just hours away! Woo Hoo! The leaves at the higher elevations are changing to their reds and golds already. Soooooooooooooooooooo pretty! My little hummingbirds are gone now. So, their feeder has no visitors. We live in a flyway, so the sound of ducks and geese heading south can be heard in the early morning as these travelers head south for the winter. They sound so cute, especially the ducks! LOL
I made a wonderful pot of soup for a friend the other day. It was truly a no brainer! You might like it. Honestly, it looks like a ton of work, but it isn't at all. Most of the ingredients go in towards the end, so you have lots of time to prep what needs to be cut.
I took five cans of chicken broth and dumped them into a kettle. To that, I added one very small onion that was cut in half, about two inches of fresh ginger that had been cubed, and about six uncut cloves of peeled garlic. I let that simmer for about an hour. After the flavors had infused the broth, I removed the aromatics and added about 3/4 c. of carrot matchsticks, about 2 c. sliced mushrooms, 2 T. soy sauce (more if you like), 1/3 c. + of mirin, zest from whole lemon. Let this cook for a little bit to allow the carrots to soften. Now it's time to finish off the soup. This is quick! Add 3 green onions cut into 3/4" pieces, 14 frozen pot stickers (I used pork w/veggie), 1/2 bag of fresh spinach leaves. Watch those potstickers closely. If they cook too long, they will open and release the filling. Just before you think the pot stickers are done, toss in 2 c. shelled and cooked edamame (in freezer section), 1" of fresh ginger that you've grated finely, 1/2 c. frozen broccoli flowerettes. If you cook the broccoli and edamame too long, they will look gray, add them last and just long enough to soften slightly without losing their bright green color. Add sesame oil to taste, but be careful as it is strong. Lastly, add 3/4 c. cilantro leaves and juice from 1/2 a lemon (or more if you like) to brighten the flavors. That's it! It was wonderful. Our friends loved it, too! If you give it a go, let me know what you think.
Now for our little Tilda. Today, I have made a sweet supportive card showcasing our Boxing Tilda! I love how this turned out! I used 12 x 12 papers which I had in my stash rather than from a 6 x 6 pad, LOL! Tilda is colored with Copics. I used a distressed stitching technique I used when I was scrapbooking. I just got bored one day with the regular look of machine stitch lines and started ripping at it. Cool, huh? There are lots of layers and die cuts. You can't see the embossing on the sentiment banner, but it is also dry embossed. To enhance your dry embossing, especially when using Nesties, take your embossing stylus (mine has three sizes of ball tips to pick from) and go over the indentations by running the stylus along the back side. You'll see that your embossed lines left by the Nesties are very crisp and clear! I thought the inside turned out so prettily, too. Got the floss, die cuts, buttons, flowers, gems, ribbon, stitching, and layering all included. LOL. I hope you like it as much as I do. Here she is:
I am just so pleased with this card. Maybe someone will be cheered up a bit when they receive it!
Thank you so much for visiting! Your comments are so appreciated. Leave a little love if you wish!
XO,
Chris
I would like to enter this card into the following challenges:
1. Papers and Such Ends 10/7 - Recipe (I think I have 3 of each)
2. Tip Top Tuesday#53 Ends 10/3 - Chose 2 items from list *tip is above*
3. Stamping Scrapping Central ends 10/9 - Red
4. Addicted to Stamps Challenge #13 ends 10/1- Stitching
5. Magnolia Stamp Loversends 10/8 - Distressing
6. Paper Sundaes Challenge Blog#88 ends 10/1 - anything goes
7. My Sheri Crafts #69 - ends 9/30 - sewing
8. Sweet Stampin' Challenge Blog ends 9/30 - anything goes
9. More Than Favors - Breast Cancer Awareness Card#53 ends 10/4 - Breast Cancer Awareness
10. Scrapalicious ends 10/4 - Anything Goes
11. Just Magnolia #126 ends 10/6 - sketch
Monday, September 19, 2011
Gymnast Tilda Card
Happy Monday Everyone,
Here's a bit of Monday morning humor. I pride myself on my cooking ability. It is one of the things I do easily. However, did I do the stupidest thing ever! Sit back and enjoy this, The Tale of the Orange Package.
I love macaroni and cheese! I bet I've prepared it less than ten times in the 37 years DH and I have been married. It's something I know isn't good for me, so I avoid. I had such a craving for it, though, that I had to break down and make some. I just craved that ooey, gooey, cheesy goodness! I was pulling an assortment of cheese from the fridge when I spotted a clear package of orange colored goodness tucked away on a shelf on the door. I thought, "Oh, good, I'll use that up, too!" I assumed that I had a product that came with a package of cheese sauce which I hadn't used and tucked on the shelf.
I grated my cheeses, cooked the pasta, and added the shredded cheese to the warm pasta. Next, I decided to add the package of orange stuff to the pasta/cheese mix. After squeezing it all into the pot, I nonchalantly licked my fingers. GASP! IT WASN'T CHEESE SAUCE!!!!! IT WAS ORANGE FROSTING!!!! I had this huge blob of orange frosting (the kind that comes with frozen breakfast rolls) right there on the top of my once wonderful mac and cheese!
I burst into peals of laughter! I couldn't stop! I wished I was wearing Depends! I quickly began scooping up the frosting to get it off the pasta before it melted into the pasta/cheese mixture! I got about 97% of the frosting out. But, as we ate the mac and cheese, I thought I would, every once in a while, taste a slight orange flavor. I figured that is probably where it did melt into the mix. *sigh* LESSON LEARNED: Mark what is contained in those little packages you don't toss but want to keep around! LOL
Did that brighten your day? If not, maybe my new little Tilda card will! Here she is:
Isn't she just the cutest? The colors of the card are burgundy and pale blue. I used my Copics to color her. I also did some inking, distressing, and machine stitching with and without thread. I added some Kindy Glitz to the ribbon which adds nice sparkle. Here are the interiors:
This was a perfect opportunity to use up some older Prima flowers.
Well, there she is! I love how the stamped image has a sense of movement rather than a posed stance. I can almost see Tilda dancing her routine.
Have a wonderful day! Thank you for visiting. Leave a comment if you wish. It would be so very much appreciated!
XO,
Chris
I would like to enter this card into the following challenges:
Order of the Opus Gluei#113 (ends 9/24) - Dancing
Kaboodle Doodles Challenge Blog #85 (ends 9/25) - Layers
Lexi's Creations #49 (ends 10/1) - A card for a child
Make It Monday#55 (ends 9/25) - Anything Goes
Ooh-La-La Creations (ends 10/1) - punches or dies
Stamp with Fun#129 (ends 9/26) - Anything Goes
There She Goes Clear Stamps #123 (ends 9/25) - Birthdaiy with Pizzaz
The Ribbon Reel #11 (ends 10/2) - photo inspiration/happy birthday
Addicted to Stamps #13 (ends 10/1) - Stitching
Corrosive Challenges #133 - Punches or Dies
Sunday, September 18, 2011
Hooked on Craft Challenge #8 - Using Ribbon & Lace
Happy Monday, to all you little chickadees! Today, I am sharing my card based on our new challenge theme at
Hooked on CraftChallenges . It's to create something using.....
RIBBON AND LACE
This challenge will run from September 19th to October 1st. Think of the possibilities of lace in its many forms! Then, to add to the mix, think of all the possibilities for the gorgeous ribbon you've been buying! This is such a fun challenge! So easy, too!
For my project, I chose to use an Asian theme. I just love, love, love these little Geisha Bears! They are just so cute! I've been holding back using my Basic Grey Kioshi papers, and I'm glad I did! They were perfect with my theme! All of the products from Hooked on Craft are listed at the bottom of this post. Here's my image, take a looksee...
The little Geisha Bear has been cut out and elevated using pop dots to give some dimension. I used Copic markers to color the image. I thought the gorgeous purple rose, rosebuds, and berry stamen cluster were perfect companions to the image and color scheme. The stamen cluster has a lovely shine to it. The paper I use for my stamped images also has a sparkle to it. It's cool because it shows through the Copic coloration giving the colored areas a subtle sparkle. You can see it on her hair. I did use Kindy Glitz on her bow and the leaves on her dress. For the swirls, I used a Doohickey Die from Magnolia as well as an accent of Magnolia ribbon.
Let's take a look at the inside of the card!
I have fallen in love with the floral lace from Hooked on Craft! It comes in an assortment of colors and is the perfect width. I chose to keep the interior relatively flat for easier mailing. I had the gem tree in my stash and added a flower and leaves from Karen's store. The stamp in called Geisha Bear with Umbrella. What a cutie!
Here are some closer looks:
Look at that lovely purple lace! Is it gorgeous or what? The color was perfect with this card! Thank you, Karen. I love it! The stamp is my most favorite quote in the whole world. It's by Khalil Gibran and says, "It is when you give of yourself that you truly give." It was a gift from my dear, sweet cyberfriend, Rosie. Love you, Sweetie! Talk about intuition - she didn't know it was my favorite quote! Imagine my surprise when I saw it!
In this photo, you can see the second little Geisha Bear with Umbrella up close. She also has two colors of Kindy Glitz on her hair adornments, pink kimono trim, and bow. The camera didn't manage to pick it up. I love the lavender pearls and that perfect purple and white flower. They were the perfect finishing touches.
Well, if you've managed to make it this far, I'm challenging YOU to play along and join in the fun! Get out that ribbon and lace. Create a masterpiece - card, scrapbook page, other craft item, using that ribbon and lace! What a great opportunity to toss your hat into the ring to win a great price compliments of Karen at Hooked on Craft Challenges! This challenge, #8, will run from the 19th of September to the 1st of October. You've got time!
Here are the links to the fabulous supplies found at Hooked on Craft in case you missed any of the links above:
Flower Lace Ribbon - http://www.hookedoncraft.com/ribbon/flower-lace-ribbon/25mm-lavender-flower-lace-craft-ribbon.html
Geisha Bear w/ Umbrella - http://www.hookedoncraft.com/stamps/bears/geisha-bear-with-umbrella.html
Geisha Bear - http://www.hookedoncraft.com/stamps/bears/geisha-bear.html
Purple Pearls - http://www.hookedoncraft.com/embellishments/self-adhesive-pearls/self-adhesive-purple-pearls-pack-100.html
Lace Doily - http://www.hookedoncraft.com/embellishments/paper-lace-doylies/126mm-white-paper-lace-doylies-in-a-pack-25.html
Purple Berry Head Stamen Bunch - http://www.hookedoncraft.com/embellishments/paper-lace-doylies/126mm-white-paper-lace-doylies-in-a-pack-25.html
Purple Layered Flower - http://www.hookedoncraft.com/flowers-and-leaves/mulberry-paper-layered-flowers/purple-and-white-mix-of-mulberry-paper-layered-flowers.html
Purple Mulberry Rose - http://www.hookedoncraft.com/flowers-and-leaves/mulberry-paper-roses/mulberry-paper-25mm-roses/25mm-purple-mulberry-paper-roses-10-pack.html
Small Purple Rosebuds - http://www.hookedoncraft.com/flowers-and-leaves/mulberry-paper-rosebuds/small-purple-mulberry-paper-rosebuds-20-pack.html
Medium Leaf - http://www.hookedoncraft.com/flowers-and-leaves/mulberry-paper-leaves.html
Other supplies include:
Basic Grey Kioshi papers and gem tree embellishment
Bazzill Cardstock
Magnolia Doo-Hickey Swirl die and heart tag die
Magnolia floral ribbon
Nestabilities dies
Go Kreate dies
Color Box Ink
Martha Stewart Border die
Close to My Heart sentiment stamp
Have a great week! I can't wait to see what you've created!
XO,
Chris
I would like to enter my card into the following challenges:
1. The Crafty Pad ends 9/24 - Diamonds
2. Corrosive Challenges Blog #133 - punches and/or dies
3. Crafty Calendars Challenge - Let Sleeping Bears Lie
4. CES Challenges#54 - ends 9/24 - Embellish Me More
5. Designed2Delight Challenge Blog - ends 9/23 - Girls and Glitter
6. Card Making Mamas - Getting Punchy
7. Paperworks Company- ends 9/30 - distressing, lace, and pearls
8. WagsNWhiskers Rubber Stamps#63 - ends 9/30 - Lace
9. Crafty Ribbons Challenge#2 - ends 9/28 - Anything Goes
10. Cute Card Thursday #182 - ends 9/20 - Anything Goes
Hooked on CraftChallenges . It's to create something using.....
This challenge will run from September 19th to October 1st. Think of the possibilities of lace in its many forms! Then, to add to the mix, think of all the possibilities for the gorgeous ribbon you've been buying! This is such a fun challenge! So easy, too!
For my project, I chose to use an Asian theme. I just love, love, love these little Geisha Bears! They are just so cute! I've been holding back using my Basic Grey Kioshi papers, and I'm glad I did! They were perfect with my theme! All of the products from Hooked on Craft are listed at the bottom of this post. Here's my image, take a looksee...
The little Geisha Bear has been cut out and elevated using pop dots to give some dimension. I used Copic markers to color the image. I thought the gorgeous purple rose, rosebuds, and berry stamen cluster were perfect companions to the image and color scheme. The stamen cluster has a lovely shine to it. The paper I use for my stamped images also has a sparkle to it. It's cool because it shows through the Copic coloration giving the colored areas a subtle sparkle. You can see it on her hair. I did use Kindy Glitz on her bow and the leaves on her dress. For the swirls, I used a Doohickey Die from Magnolia as well as an accent of Magnolia ribbon.
Let's take a look at the inside of the card!
I have fallen in love with the floral lace from Hooked on Craft! It comes in an assortment of colors and is the perfect width. I chose to keep the interior relatively flat for easier mailing. I had the gem tree in my stash and added a flower and leaves from Karen's store. The stamp in called Geisha Bear with Umbrella. What a cutie!
Here are some closer looks:
Look at that lovely purple lace! Is it gorgeous or what? The color was perfect with this card! Thank you, Karen. I love it! The stamp is my most favorite quote in the whole world. It's by Khalil Gibran and says, "It is when you give of yourself that you truly give." It was a gift from my dear, sweet cyberfriend, Rosie. Love you, Sweetie! Talk about intuition - she didn't know it was my favorite quote! Imagine my surprise when I saw it!
In this photo, you can see the second little Geisha Bear with Umbrella up close. She also has two colors of Kindy Glitz on her hair adornments, pink kimono trim, and bow. The camera didn't manage to pick it up. I love the lavender pearls and that perfect purple and white flower. They were the perfect finishing touches.
Well, if you've managed to make it this far, I'm challenging YOU to play along and join in the fun! Get out that ribbon and lace. Create a masterpiece - card, scrapbook page, other craft item, using that ribbon and lace! What a great opportunity to toss your hat into the ring to win a great price compliments of Karen at Hooked on Craft Challenges! This challenge, #8, will run from the 19th of September to the 1st of October. You've got time!
Here are the links to the fabulous supplies found at Hooked on Craft in case you missed any of the links above:
Flower Lace Ribbon - http://www.hookedoncraft.com/ribbon/flower-lace-ribbon/25mm-lavender-flower-lace-craft-ribbon.html
Geisha Bear w/ Umbrella - http://www.hookedoncraft.com/stamps/bears/geisha-bear-with-umbrella.html
Geisha Bear - http://www.hookedoncraft.com/stamps/bears/geisha-bear.html
Purple Pearls - http://www.hookedoncraft.com/embellishments/self-adhesive-pearls/self-adhesive-purple-pearls-pack-100.html
Lace Doily - http://www.hookedoncraft.com/embellishments/paper-lace-doylies/126mm-white-paper-lace-doylies-in-a-pack-25.html
Purple Berry Head Stamen Bunch - http://www.hookedoncraft.com/embellishments/paper-lace-doylies/126mm-white-paper-lace-doylies-in-a-pack-25.html
Purple Layered Flower - http://www.hookedoncraft.com/flowers-and-leaves/mulberry-paper-layered-flowers/purple-and-white-mix-of-mulberry-paper-layered-flowers.html
Purple Mulberry Rose - http://www.hookedoncraft.com/flowers-and-leaves/mulberry-paper-roses/mulberry-paper-25mm-roses/25mm-purple-mulberry-paper-roses-10-pack.html
Small Purple Rosebuds - http://www.hookedoncraft.com/flowers-and-leaves/mulberry-paper-rosebuds/small-purple-mulberry-paper-rosebuds-20-pack.html
Medium Leaf - http://www.hookedoncraft.com/flowers-and-leaves/mulberry-paper-leaves.html
Other supplies include:
Basic Grey Kioshi papers and gem tree embellishment
Bazzill Cardstock
Magnolia Doo-Hickey Swirl die and heart tag die
Magnolia floral ribbon
Nestabilities dies
Go Kreate dies
Color Box Ink
Martha Stewart Border die
Close to My Heart sentiment stamp
Have a great week! I can't wait to see what you've created!
XO,
Chris
I would like to enter my card into the following challenges:
1. The Crafty Pad ends 9/24 - Diamonds
2. Corrosive Challenges Blog #133 - punches and/or dies
3. Crafty Calendars Challenge - Let Sleeping Bears Lie
4. CES Challenges#54 - ends 9/24 - Embellish Me More
5. Designed2Delight Challenge Blog - ends 9/23 - Girls and Glitter
6. Card Making Mamas - Getting Punchy
7. Paperworks Company- ends 9/30 - distressing, lace, and pearls
8. WagsNWhiskers Rubber Stamps#63 - ends 9/30 - Lace
9. Crafty Ribbons Challenge#2 - ends 9/28 - Anything Goes
10. Cute Card Thursday #182 - ends 9/20 - Anything Goes
Monday, September 5, 2011
Paper Creations Ink Guest Designer!
It was such a sweet surprise to be asked to be the Guest Desiger for Challenge #8 at Paper Creations ink. I have to tell you, I was a bit apprehensive because I was going to use digital images! I was so worried I'd not do it right. I only have an ink jet printer, so I took the images to a copy shop and had them printed using their laser printer. That was a good choice because I could use my distress inks!
Here are the details on this fun challenge if you'd like to join in the fun! The theme is Vintage/Distressed. You can use any image you'd like. It can be an ATC, scrapbook page, card, or other crafty entry as long as it has paper which you've incorporated into the challenge of Vintage/Distressed.
The challenge runs fro today until Sept. 18. There is a nice little digi gift certificate prize for you, too! Come on, give it a go!
Here is my card for inspiration:
I used paper from several different manufacturers. The CS in Bazzill. The large pearls are Martha Steward. The small pearl string is from my stash. I used Distress inks to ink the background papers as well as color the stamped image. The corner is by Dress It Up. The tag is from K & Co. The flowers, I believe, are from Prima.
Thanks for stopping by!
Chris
Sunday, September 4, 2011
Hooked on Craft Challenge #7 - Spring has Sprung!
It's so hard to think about Spring when I am waiting with bated breath for the cooler temperatures of Fall and Winter, LOL. Those of you in the Southern Hemisphere are probably just as anxious for Spring as I am for Fall! It's been so hot and humid here. Temps were about 110° F (about 44° C) on most days for the past couple of weeks. It really won't really cool down until November, but it will at least be less than 110° very soon. With the humidity, it has just been uncomfortable! At least we haven't had any hurricanes, tornadoes, or earthquakes - for that I am truly grateful!
Our new challenge at Hooked on Craft Challenges focuses on the theme, "Spring has Sprung!" How perfect is that? The challenge will run from September 5th until September 17th. The theme is broad enough for you to include Spring flowers, plants, gardens, etc. Elements related to the theme may be found in your paper, embellies, or images. As always, Karen will have a sweet prize for our winner! Good luck, gals!
I know that it is hard to see the complete banner, but Blogger limits the photo size. I think if you click on the image, it will reveal a larger one. I will give you photos of all of the components. Each pennant has been separated from the next by a little tag made from a Magnolia doohickey tag set. I used Quickutz dies for the alphas. In the upper left of each alpha tag is a beautiful little white daffodil accented by punched stems. On the upper right of each tag, I have also used gorgeous roses as a way to separate the components. The roses are in three differing shades of pink. Soooooooooooo pretty!
Now, for the pennants. These were made with my Nestabilities dies. I used three sets: scalloped pennant, straight edged pennant, and a pennant border set. Each of the stamped images has been colored with Distress Inks.
For this pennant, I used the sweet little stamp called Cute Puppy With Flower Isn't it just the cutest? I also used tiny Prima flowers and centered each one with a little white pearl.
This pennant features the stamp entitled, "Cute Puppy with Bone." Again, this image was also colored with Distress Inks. The top of each banner has been elevated using pop dots.
Here is the midpoint pennant featuring a stamp entitled, "Cute Puppy Sitting" Look at the perfection of that paper rose! These are G-O-R-G-E-O-U-S!
Our fourth pennant features Cute Puppy in Kennel. I thought that little dog house was so adorable with the flowerpot chimney. The Distress Inks really made the slats look like wood. I tried to give some depth to the image of the dog house. It's hard to see in the photo, though
The final pennant has the adorable Cute Puppy Walking stamp. I love that little ladybug on the pup's tail! Too cute!
Thank you so much for visiting. I hope you enjoyed your visit and got some inspiration from what I've created. Have a wonderful week!
XO,
Chris
Subscribe to:
Posts (Atom)